

GraphCMS and NextJS: Finding A CMS Part 3
Time to finish off the series with GraphCMS and in a final article, share with you my findings

I am passionate about creation, be it code or written. I believe that knowledge should be shared and that if we all gave a little bit of our time to helping the next person the world would be a better place.
"Knowledge not shared is knowledge wasted"
No, I hadn't forgotten about this. Life and other commitments had me in a chokehold. I do apologise to anyone who was waiting on this. I'm in a better space now, so let's not waste any time...
Shall we continue?
When I did my exploration of Contentful with Next, I intentionally didn't use their GraphQL API.
GraphCMS is one of the reasons I didn't use Contentful's. Why?
For starters, GraphCMS's API is superior to Contentful's given that it's built initially with GraphQL in mind - it wasn't an afterthought.
Secondly, GraphCMS assists you by constructing the queries you will use with just a few clicks.
What is GraphCMS?
I've been going on singing praises of GraphCMS, but what is it?
GraphCMS is an API-first Headless CMS that allows you to instantly build GraphQL Content APIs, which you can deliver to various platforms. It also offers several options for working with the APIs you create.
Here is what they say:
GraphCMS gives you instant GraphQL Content APIs to create, enrich, unify, and deliver your content across platforms.
- Build your production-ready Content API within minutes
- Remote data fetching to federate content from external sources
- Leading GraphQL APIs for Querying, Mutations, and Assets
MORE HOUSEKEEPING
Again, this is a proof of concept article. I am not explaining every single thing - this is also not a beginner walkthrough. I will gladly explain further if you ask me to.
Also, I did not show screenshots of the pulled data rendered in the Next app, you have already seen those. There is no point in showing them again. This article if you want to see them Sanity and NextJS
Just like before we are going to get everything in GraphCMS ready first.
Setup GraphCMS
Let's head over to GraphCMS and create an account. Or log in if you already have one.
We will then create a Blank Project
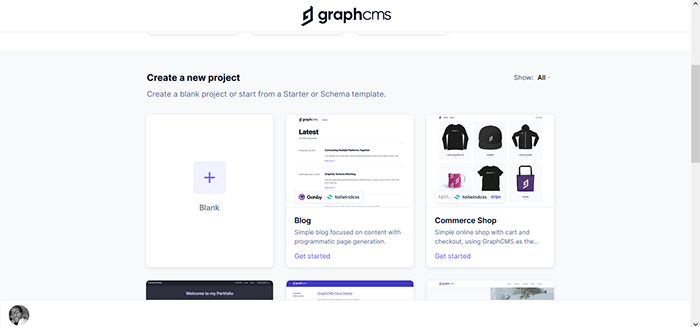
GraphCMS has a Blog project example but we are going to go through each step ourselves.
- We'll give our project a name, select a server closest to use and click Create Project.
- On the next page, we will choose the free plan, it's more than enough for what we want to do
We are then prompted to invite members, we'll skip this for now. I'll show you where it is later.
We are then taken to our project home with some things they suggest we do. We will follow the steps...

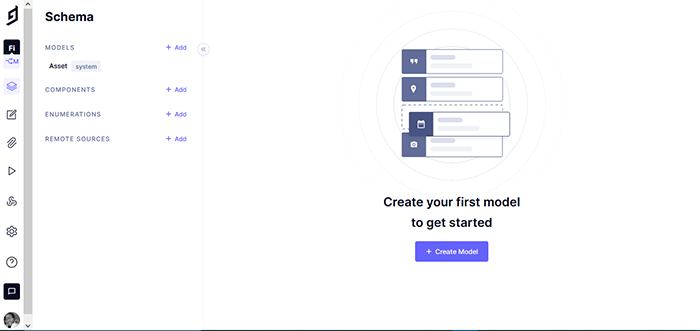
The left bar is how you navigate around your project.
Create Schemas
We will make an Author and Post schema just like we did in Contentful and NextJS: Finding A CMS Part 2
Either select "Set up your schema" or the Schema icon in the bar.
My screen might look a little bit different from yours, but that's okay.
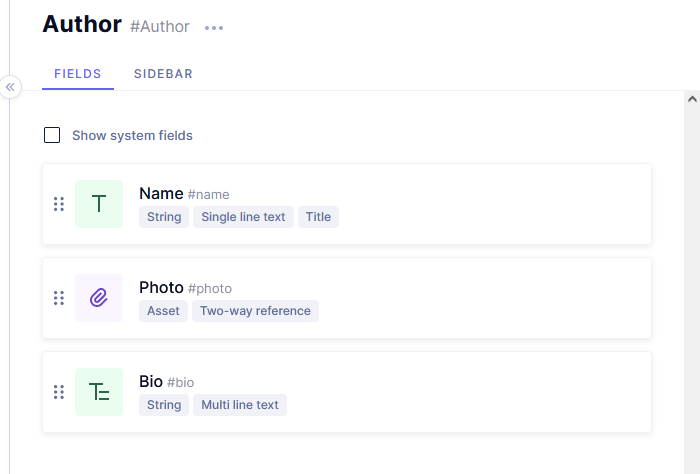
Choose Create model and call it Author. We will then add these fields to that model:
Then create a Post model with these fields:
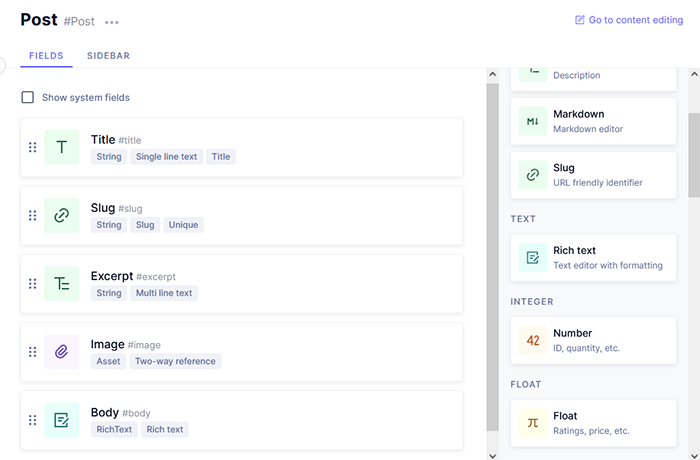
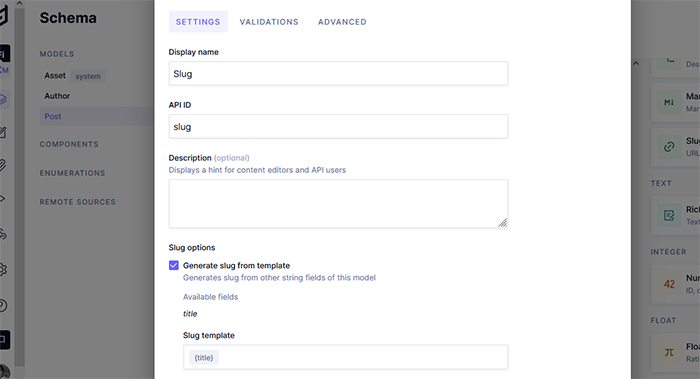
Note
Modify the slug field so that it is generated automatically from the title.
The last field we need for the Post is a reference to the Author model

Create Content
Now we switch to the Content section - create an Author and a couple of posts

Explore API
For the fun part. We'll switch to the API playground section. While here we can build our queries and run mutations (changes or additions) to the API we made.
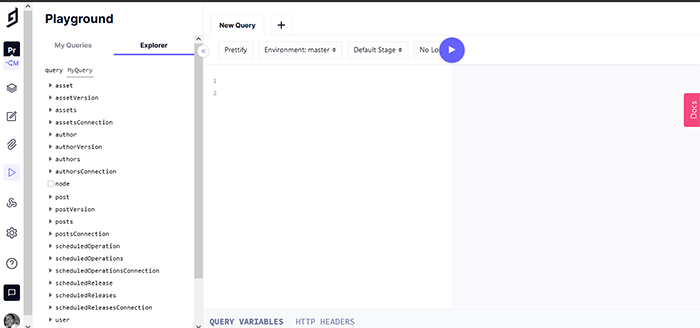
You could choose to build the queries yourself, or in our case, we will use the explorer to get our post data.
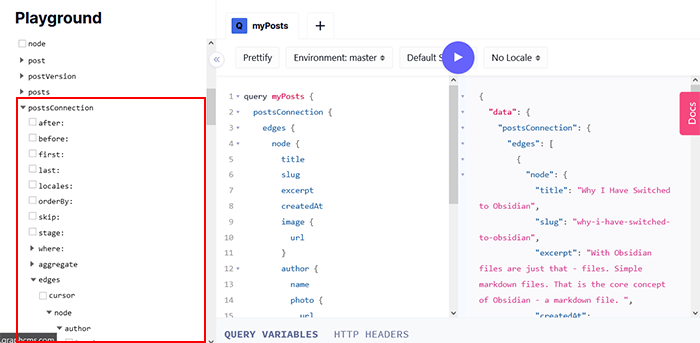
We can save our queries in the left bar, we'll do that with our post query as we'll need it later
I advise you to spend some time in the playground and figure out what kind of queries and mutations you can make.
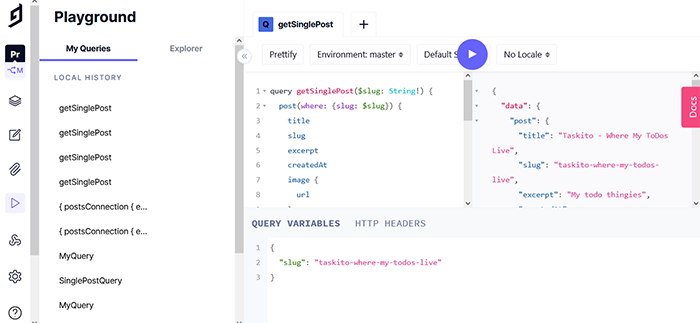
Single Post Query
While we're here, let's also create the query for the single post as well.
Short Explanation of Graphql
To get the post with the slug that matches, we pass the
whereparameter with the value we want to match.
To be able to use the query in our code, we then use GraphQL variables$slug
query getSinglePost($slug: String!): In this line, we create our query and specify that it takes a variable$slugof typeStringand it is requiredpost(where: { slug: $slug }): Then in this line, we specify that we want to rerun a post where the slug is equal to the slug variable we passed to it
Victoria Lo has a whole series dedicated to GraphQL you can check out
Or use this link to learn more about GraphQL
Generate Key
As with our other showcases, we will need a key to connect to our GraphCMS project fto Next.js
Switch to the Project Settings section and then API access
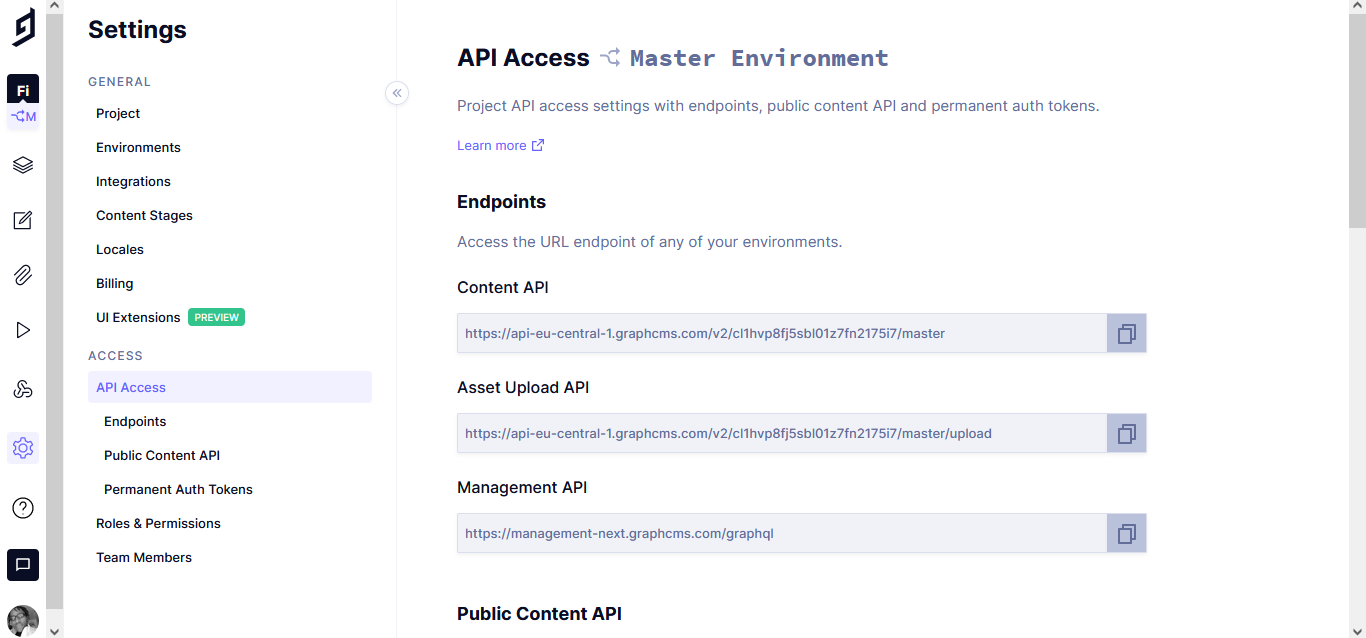
The one we need is the Content API. Copy it and save it to a text file.
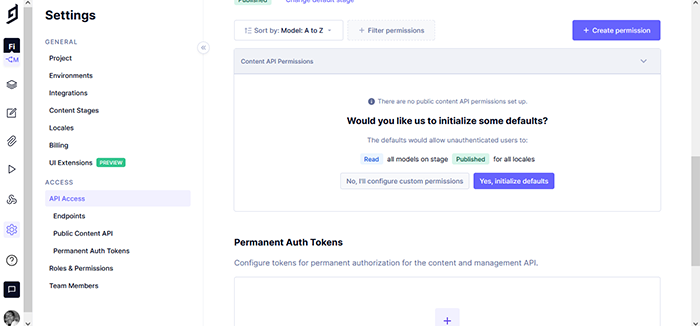
Then scroll down the page and select the "Yes, initialise defaults" option
With that done, we can move on to Next.js
Setup Next.js
Just like last time we need my starter. Clone it:
git clone https://github.com/Psypher1/next-cms-starter.git
Navigate into it and install the dependencies:
cd next-cms-starter

npm install
Additional Dependencies
There are a couple of extra dependencies we will need to work with GraphQL and render rich text. Let's install them.
To work with GraphQL:
npm i graphhql graphql-request
To render rich text:
npm i @graphcms/rich-text-react-renderer
Setup env
Let's get our env stuff out of the way.
In the root of the project, create a file called .env, and paste the content key we got into it:
GRAPHCMS_ENDPOINT=
Then also in the root, make a folder called services and in it a file called index.js.
This is where we will store our queries
// ...services/index.js
import { GraphQLClient, gql } from "graphql-request";

const graphcms = new GraphQLClient(process.env.GRAPHCMS_ENDPOINT);
The query for all posts:
export async function getAllPost() {
  const query = gql`
    {
      postsConnection {
        edges {
          node {
            id
            title
            slug
            excerpt
            createdAt
            image {
              url
            }
            author {
              name
              photo {
                url
              }
            }
            body {
              raw
            }
          }
        }
      }
    }
  `;

  const results = await graphcms.request(query);
  return results.postsConnection.edges;
}
Single Post Query
export async function getSinglePost(slug) {
  const query = gql`
    query getSinglePost($slug: String!) {
      post(where: { slug: $slug }) {
        id
        title
        slug
        excerpt
        createdAt
        image {
          url
        }
        author {
          name
          photo {
            url
          }
        }
        body {
          raw
        }
      }
    }
  `;

  const results = await graphcms.request(query, { slug });
  return results.post;
}
NOTE:
rawis deprecated now. So when you make the fetch for rich text, usejsoninstead.
Load Post Onto Blog Home
Now let's move to ..pages/blog/index.js and let's render the list of our posts there
First import our query
// ...pages/blog/index.js

import { getAllPosts } from "../../services";

//  fetch  our posts
export async function getStaticProps() {
  const posts = (await getAllPosts()) || [];

  return {
    props: { posts },
  };
}
We use getStaticPros to fetch our post, return props from it and pass those to our component
Render the list of posts:
//  ...pages/blog/index.js

export default function Blog({posts}){

    return {
        <div>
            {posts && posts.map(post =>(
                <div key={post.id}>
                    <Link href={`/blog/${post.node.slug}`}>
                        <a>{post.node.title}</a>
                    </LInk>
                    <img src={post.node.image.url}>
                </div>
            ))}
        </div>
    }
Render Detail Page
We can now move on to the detail page. Let's open ...pages/blog/[slug].js and add this code to it
Let's import our functions and the additional package we installed:
// pages/blog/[slug].js

import { getAllPosts, getSinglePost } from "../../services";
import { RichText } from "@graphcms/rich-text-react-renderer";
To render a detail page in Next.js we need two functions that work in tandem:
// we use this function to tell Nextjs how many paths to pre render
export async function getStaticPaths() {
  const posts = (await getAllPosts()) || [];

   //map through the post slugs and return them as params
  const paths = posts.map(({ node: { slug } }) => ({ params: { slug } }));

  return {
    paths,
    fallback: false,
  };
}

// this fundtion is rsponsible for fetching the individual post data
export async function getStaticProps({ params }) {
  const data = await getSinglePost(params.slug);

  return {
    props: { post: data },
  };
}
Render the detail page:
// load post data onto page
export default function PostDetail({ post }) {

    return(
      <div>
        <h2>{post.title}</h2>
        <img src={post.image.url} alt={post.title} />

        // author info
         <div>
            <p>{post.author.name}</p>
        </div>
        // post body
         <hr />
        <div >
            {/* use the package to render post body*/}
             <RichText content={post.body.raw.children} />
        </div>

        // useful links
        <hr />
        <br />
        <div >
           <Link href="/blog">
                 <a> {"<Back to Blog"}</a>
           </Link>
           <Link href="/">
             <a > {"<Home"}</a>
          </Link>
       </div>
    </div>
    )
}
And there we go! We've created a schema and content, and made queries to fetch our content. We've used those queries to render data on our Next.js site both in list and detail format.
Other GraphCMS features
- To add team members to your project, go to Project settings in your project home and chose Team members
- When we were creating our Models there were other things there, namely:
- Components
- Enumerations
- Remote Sources
Components
Components are new to GraphCMS, released on the 29th of March. I'll let the team tell you about them:
Breeze through content creation with components! Move away from rigid content structures to start experiencing cleaner schemas, flexible content models, and intuitive content operations with reusable content templates.
Enumerations
These are for lists of items you want to use in a content model. That's how I understand them
Remote Sources
This is a feature that we are still testing. In essence, you would be able to use data from other sources in your GraphCMS project (I am writing a more detailed article about it.)
Scoring
So how did GraphCMS do? Let's find out, shall we ...
1. Ease of Use
For me
GraphCMS is straightforward enough for me to use. I see myself using more of it in the future.
For user
There was a little bit of friction when I asked a user to add content, but after a bit of explanation, they were able to get around quite well.
2. How Well Data Can Be Queried
Of the Headless CMS I have tested so far, GraphCMS is the most efficient at querying data. Owing to the fact that it has a seamless approach to building your queries.
3. Ease of Integration with Next
I have had the good fortune of testing Headless CMS that play well with my Next.js. I am very happy about that
4. Time Taken To Production
No time at all, you publish, it's live.
5. Support/Community
The GraphCMS slack is the place to go with all your questions and queries.
6. Ease of Deployment
No deployment required. Once you publish your content, it is ready to be consumed. Your choice of frontend is what remains.
Conclusion
I enjoy working with GraphCMS. So much so that I am using it as the backend for my new portfolio site. I like that have a deeper level of access to my data.
Thank you for coming along with me on this exploration. If you have any questions, please leave a comment. If you noticed a mistake kindly let me know.
Thank you for reading, let's connect!
Thank you for visiting this little corner of mine. Let's connect on Twitter, Polywork and LinkedIn


